My wicked sick PAT tutorial

This forum made possible through the generous support of SDN members, donors, and sponsors. Thank you.

Sama951

Full Member
15+ Year Member
Joined
Apr 14, 2008
Messages
145
Reaction score
39
Ok, so, because I have an english midterm tomorrow that I don't want to study for, and because there's 600 posts about how impossible TFE is, and also because I'm good at TFE and feel like being a hero, I'm gonna make a little tutorial where I post a couple of them and talk you through the answer! After I do that, you can scan/post any other ones you want and I'll do my best to explain them. I don't use any weird strategies, I just look at the lines and visualize it in 3D. The tips and tricks you hear about might help narrow it down in some cases but if you can visualize it properly you'll be able to get every question every time.

Oh and excuse the fact that there's writing all over my examples, haha.

Ok first one..
Original.jpg


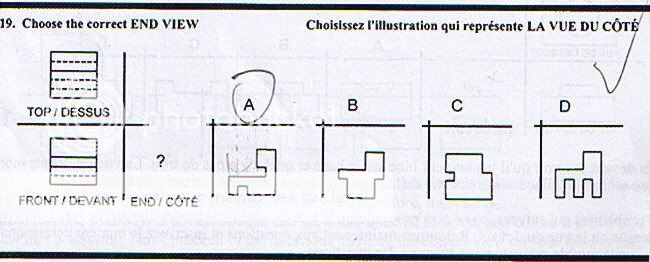
Alright this is a good example for explaining what solid and dashed lines mean.

I assume everyone knows what the different views represent... If not then think of it this way... Imagine a person looking into a camera lens.

A straight up mugshot of the person's face is a "Front" view. Now if you take the camera and move it up, then pivot it and aim it downwards, you've got a "Top" view. Now for the end view, take the camera and put it back in front of the person's face...then you'd take a side-shot of the person's left cheek (but since you're the camera man and you're facing them, you're moving the camera to your right side).

Ok great.

First, looking at the top view, you have one solid line that goes all the way across, from left to right. That means that from a side view, you're only going to have one change in height. Now remember that a straight line like that can mean a straight up drop in height, or it can mean there's a slope with a gradual decline. Looking at all the answers though, it's pretty obvious that we're not looking at any slopes. However, every one of the answers has a single drop in elevation on the top part, so that little bit of information isn't going to narrow it down too dramatically. But... dun dun dun.. look at choice C. Choice C does have a drop in elevation at the top, which is what we decided we're looking for, but it's got the drop at the position of one of the dashed lines (you can tell by the position and thickness of the notch). That's bad! I'm sure this is a trap some people fall into, but yeah, don't. Look at "Fig 1" to see which solid line I'm talking about and where it corresponds to a drop in height in each of the answers (green). Red line = danger = don't fricken do it. Dashed lines do not represent any changes in elevation on the surface they appear on (did that make sense?). Dashed lines are there to show you that there's some kind of height difference deeper into the object, or on the other side all together (what I mean is, it could be a hole that passes through the middle of the object, I'll explain more later if I find an example)

Fig 1
Fig1.jpg


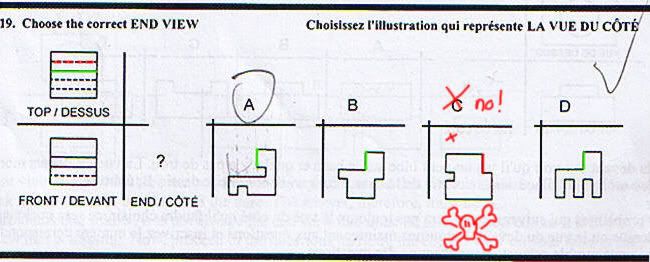
On to the dashed lines we go.

So we've got three horizontal dashed lines on the top view. That means that somewhere in the object, you've got at least 3 extra "walls" (you'll see why I say 'at least' in a second). In other words, there's some kind of height change somewhere that isnt visible from the top. Based on the relative positions of the lines, you'll be able to figure out where the 'height' differences are supposed to be.

Let's compare this to the answer choices. Choice A has 3 walls that you cant see from the top view, D has 4. However, look at the orange line in Fig 2 with the question mark. This wall is lined up perfectly with the blue height change that we discussed above. Because of this, its dashed lines won't show up in the top view (for no reason other than the fact that if you draw a solid line on top of a dashed line...you get a solid line :D).

All the walls are spaced apart proportionally to the dashed lines in the top view of the original figure in A and D. Look at B though, it only has 2 of these "walls" that we established you couldn't see from the top. Look at Fig 2. Green = good, red = bad, blue = done, orange = tricky POS.


Fig 2
Fig2.jpg


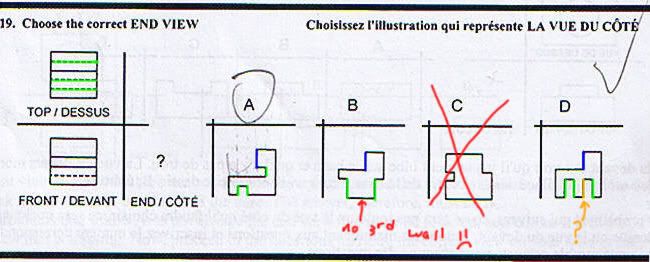
Great, so we've narrowed it down to A or D. We've done about all we can do with the top view so let's go to the front view. Here we've got 2 solid lines, so from a head-on view, there's 2 height changes. From everything I've said so far about the top view, this should be really easy to figure out, so I'm just gonna include a final figure (green = solid lines and what they correspond with, blue = stuff we already talked about, red = why D is wrong, and orange = dashed lines and what they correspond to)

Notice also how high up the notches go in D, I've highlighted them in red. You should notice that these are way, way higher up than the dashed lines on the front view, so that's another way to eliminate it.

Fig 3
Fig3.jpg


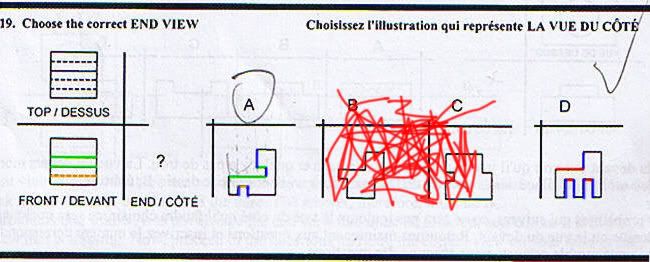
Alright so after all that we can safely conclude that the answer is indeed C.


Just kidding...:rolleyes:.......It's A.

So yeah, that took way longer than I thought it would and I'm thinking it might have been too simple of an example to be helpful... I hope it helps someone though. If someone can find a really hard one they want me to go through post it here.

Oh crap.. exam tomorrow:scared:

Members don't see this ad.
 
  • Like
Reactions: 23 users
Here is a second set of Hole-Punching tutorials.

Justin (2thDMD)

NOTE: All of the original images I used as a basis for this post/tutorial were provided courtesy of © Crack the DAT 2009.

At the bottom of this post/tutorial is a weblink that will take you to their website so you can see their portfolio of DAT-related study products.


DAT-PAT-Tutorials-HolePunching-20-V.jpg


******************************************************************


DAT-PAT-Tutorials-HolePunching-22.jpg


******************************************************************


DAT-PAT-Tutorials-HolePunching-24.jpg


******************************************************************


DAT-PAT-Tutorials-HolePunching-01.jpg


Crack the DAT software is available here: DAT Practice Tests & Dental Admission Test Preparation - Crack DAT
 
Last edited:
awesome thread. Now all I need is a tutorial for angle ranking :D

Check out post #184 of this thread.
I listed a couple quick little tips that I use.
http://forums.studentdoctor.net/showpost.php?p=7506660&postcount=184

Sorry it's not a visual tutorial, but angle ranking is one of the simplest parts of the PAT (in terms of structural complexity, or lack thereof), and concurrently one of the toughest (due to the sometimes infinitesimally small differences in angles).

Justin (2thDMD)
 
Members don't see this ad :)
Check out post #184 of this thread.
I listed a couple quick little tips that I use.
http://forums.studentdoctor.net/showpost.php?p=7506660&postcount=184

Sorry it's not a visual tutorial, but angle ranking is one of the simplest parts of the PAT (in terms of structural complexity, or lack thereof), and concurrently one of the toughest (due to the sometimes infinitesimally small differences in angles).

Justin (2thDMD)

we are waiting for the folding, hope you have time, take care! and thanks alot for doing this, I know alot of people needed it!
 
Very nice tutorials! You're TFE saved me :), I was about to start yanking my hair out with the frustration...

I just had one question, though, on the real DAT are there half-hole punch questions? I've read in a few posts that there are none, but that Crack PAT has them - and then you posted these (which are very well done) but they confused me...I'm not really having any problems with them as this is my best section in perceptual ability, so I was happy to know that I could do these alright, but I would like to be ready for it, if it comes.

can't wait for your pattern folding, 2thDMD!!:p

That's a good question. I can't remember for certain if there are half-hole punches on the real DAT. Come to think of it, I don't think there are....only solid hole punches.

Thanks for the feedback.
Glad the TFE tutorials helped.
I literally just logged on to upload a couple pattern-folding tutorials.
They are much more time intensive than I was anticipating.
I was able to do 3 of them so that I could post tonight, as promised.
I'll see if I can tackle some brain-bender pattern-folding problems in the next couple of days...if I can find the time.

Justin (2thDMD)
 
Here are a couple of the Pattern-Folding tutorials I promised.

Justin (2thDMD)

NOTE: All of the original images I used as a basis for this post/tutorial were provided courtesy of © Crack the DAT 2009.

At the bottom of this post/tutorial is a weblink that will take you to their website so you can see their portfolio of DAT-related study products.


DAT-PAT-PatternFolding-1-03.jpg


******************************************************************


DAT-PAT-PatternFolding-2-01.jpg


******************************************************************


DAT-PAT-PatternFolding-3-04.jpg


Crack the DAT software is available here: DAT Practice Tests & Dental Admission Test Preparation - Crack DAT
 
Last edited:
Firts God bless you for everything, maybe I suck at folding, I understood all the other sections you did except this? and for the real DAT the questions were not like this maybe one or two. anyways I still suck at this section, any advice???
 
I really dont understand how you did the numbering thing, its confusing.
 
Members don't see this ad :)
I really dont understand how you did the numbering thing, its confusing.

The numbering thing is something I do (in my mind) when I'm looking at a figure. I pick a panel I want to focus on, then I pick a junction where that panel is seamed with a neighboring panel and number that seam #1. Then I number the end of the panels that are coming off the #1 junction in successive order.
Look at the example with the numbers in it.
When you fold this pattern starting at the #1 position, one of the #2's will be folded in the direction of (and eventually touch) the other #2. The #3's will all touch each other as well. Same with the 4's. The numbering thing is basically just a way for me to keep track of what touches what when the final figure is complete.

If this still doesn't make sense, I would recommend printing out the numbered example I did, cut out the pattern, number all the positions as I have, then fold the figure. Then you'll see what I mean when I say that the the 2's will touch, and the 3's will touch, and the 4's will touch when the figure is finally completely folded.

Justin (2thDMD)
 
Firts God bless you for everything, maybe I suck at folding, I understood all the other sections you did except this? and for the real DAT the questions were not like this maybe one or two. anyways I still suck at this section, any advice???

What do you mean "not like this"? Were they harder?...easier?
I remember a range of difficulty in this section. Some were "relatively" easy and others were black holes that all of your time got sucked into.

If you have any examples that you can post, I'll be happy to take a look at them.

Justin (2thDMD)
 
I went and did Crack the PAT 1, and its seems that I am really strugling with the ones like 85, 86, 87, in fact I got all three wrong, maybe I dont know how to fold. The ones with big figures to locate are not hard for me. thanks alot Justin your money!
 
I am planing on going to dental school and would like to prepare for the DAT. Is there anyone out there locally who is in the same boat and would like company to study? I am in the New york city area my email [email protected], only those serious should respond, thank you. God bless and good luck.
 
I took the DAT on monday, and I have to thank this thread. I sharpened my skills and learned some important small details about how box folding worked. I got a 23 and 99.0 percentile.

This PAT tutorial is Amazing.

THANK YOU!
 
Hey everyone,
I'm gonna make a lil contribution to this thread and it deals with dice questions and/or cubes. My method is you lay your left hand flat with your palm facing up and then use your other hand and with your palms facing each other, make a sort of spider legs with your thumb, index, middle, and ring finger extended and toucing the opposite palm. Your thumb will be at the bottom, index the left side, middle the top, and ring the right side. The palm on top will be centered number.
It may seem confusing so I'm goin to use the dice from the first page as an example and can verify your how B is correct.
diceorig.jpg


Since the four will be the bottom of the cube that will be your left hand palm. Your other hand will have the five as your other palm, index as the 1, middle will the be 3, ring the 6, and thumb the 2. From there your can move your hands so that you can see whatever perspective you want. I'm gonna be looking like a ***** while doing these questions however after some practise this becomes pretty efficient.
 
Last edited:
doesnt look like a mistake to me, there's a cube there.

think of it this way, the cube you have circled is only 1 high, and towards the northwest they stay 1 high. directly SW of that cube there's a stack 1 high, and then a stack 2 high attached to it. Directly SE of that cube is a stack that is 2 high, and then a stack that is 5 high.

I'm not seeing what you mean by only 1 high stacks. Maybe it is how my mind is seeing it, but it looks like 5 stacks of 2 cubes with an opening NE of the circled cube. The reason it looks like a stack of 2 to me is because the cube is closed off towards the top (facing that opening).
 
I'm not seeing what you mean by only 1 high stacks. Maybe it is how my mind is seeing it, but it looks like 5 stacks of 2 cubes with an opening NE of the circled cube. The reason it looks like a stack of 2 to me is because the cube is closed off towards the top (facing that opening).


The "opening" you see to the NE is not an opening, it is a single cube. In my post, when I referred to the "circled cube", I was talking about this single cube that you perceived as an "opening". I hope that helps :scared:

Oh and, if it helps, there's a total of 17 cubes in that figure
 
According to the answer key, the figure has 3 cubes w/ 2 sides painted, 7 cubes with 3 sides, and 4 cubes with 4 sides.
 
Last edited:
Ok. So that's 17 total cubes like I said. Do you see all 17 now based on what I said?

Yeah I see it now. It seems like on the real DAT though, you would never see a question like that (since it is so open to an argument by a test taker). Has anyone ever seen a question like that on the real DAT?
 
ohh yikes, I see it now too. Thanks for the help and hopefully we'll never see one like this on the real DAT
 
angle ranking is really killing my score on CDP, i keep getting between 8-11, any advice? I tried the hill technique, but its not really working
 
this might be a bit redundant , but whats the best way to approach and do keyholes, i feel that it can enter for like every side.. please help....thanks
 
this thread is sooo helpful.. I wish CRACK DAT PAT has all these explanations! thank you guys for sharing!
 
You're amazing!! Thank you for taking the time to do this. Are you in dental school now? Where'd you end up? My exam is coming up next week!
Thanks again for this tutorial. :)
 
this thread is sooo helpful.. I wish CRACK DAT PAT has all these explanations! thank you guys for sharing!
While my initial goal was to just "throw together" some tutorials to explain some PAT concepts to the pre-dental students out there having some difficulty with the PAT, I'm sort of a perfectionist by nature and really got into how precise, concise, clean and clear I could make the tutorials, and the tutorials above are the result. I love spatial things like this, so it was a lot of fun for me to create them.

CrackDATPAT liked the tutorials enough to contact me and I wound up selling them the tutorials I posted here so that they could include them in future editions of their software.
Since I really like teaching people, one of the things that I insisted on as part of the deal for signing over my rights to the tutorials that I created was that I be allowed to leave these tutorials up on this thread so that everybody has access to them. :)
As for their inclusion in future CDP releases, I'm not sure when that'll happen.

They've also asked me if I wanted to teach classes/seminars about things like this on the PAT, and indicated that they are open to me doing more tutorials for them in the future. Obviously, if I did do tutorials for them in the future, I wouldn't be able to post them on this site :(, but they would be part of the CDP software package. I guess if enough people want that and/or contact them, then maybe I'll have to consider it, but as of now I have my own studies to get to.

Glad everybody likes the tutorials.

Sama, thanks for starting the thread....good choice of topic.

2thDMD


P.S. I currently have the tutorial photos uploaded to (read: hosted by) PhotoBucket. If, for some reason, PhotoBucket goes under, or you cannot see the tutorial pictures, send me a Private Message and I'll find another hosting site. I know how frustrating it can be to really want to see a page and get a HTTP 404 error.​


That is awesome. Congratulations, you obviously deserve it. :)
 
thanks for your great tutorial....can you show us how you do pattern folding when there is no central side attached to 4 other sides, most of the pattern folding questions that I see on CDP have only 3 sides attach to it ( think of the unfold pattern as a "T") sorry, I dont know how to attach a picture form CDP here.

thanks so much
 
hey what do u mean exacftly by the "EMPTY SPACE" rule.. i just dont get it as to why the outline of the triangle can be hole punched.. but not the middle of it? im so losttttttttttttttt
 
could u explain the empty space method more clearly i just don't get it????? thank u tho for all of the tutorials!!! may god blesss u!


Here is a second set of Hole-Punching tutorials.

Justin (2thDMD)

NOTE: All of the original images I used as a basis for this post/tutorial were provided courtesy of © Crack the DAT 2009.

At the bottom of this post/tutorial is a weblink that will take you to their website so you can see their portfolio of DAT-related study products.


DAT-PAT-Tutorials-HolePunching-20-V.jpg


Divider-Cyan.jpg


DAT-PAT-Tutorials-HolePunching-22.jpg


Divider-Cyan.jpg


DAT-PAT-Tutorials-HolePunching-24.jpg


Divider-Cyan.jpg


DAT-PAT-Tutorials-HolePunching-01.jpg


Divider-Cyan.jpg


Crack the DAT software is available here: http://www.crackdat.com/
 
could u explain the empty space method more clearly i just don't get it????? thank u tho for all of the tutorials!!! may god blesss u!

Hello Prsndentist,

Oddly enough, I was just checking this post and saw that you had posted a question yesterday.

Since your question pertains to a pre-existing tutorial I posted on SDN many months ago, I don't think that Crack DAT PAT will mind me calling up the pictures from the hosting service to make it easier to explain what I mean by "Empty Space".

Having said that, I want to give them their due for letting me utilize their graphics in the first place, so:


NOTE: All of the original images I used as a basis for this post/tutorial were provided courtesy of © Crack the DAT 2009.

At the bottom of this post/tutorial is a weblink that will take you to their website so you can see their portfolio of DAT-related study products.​


Okay, first let's review my "Guidelines" or "Rules" section...read this entirely so that you have a firm understanding while I go through the explanation.

DAT-PAT-Tutorials-HolePunching-01-R.jpg


Divider-Cyan.jpg


DAT-PAT-Tutorials-HolePunching-22.jpg


And now, on to the explanation...


First, look at the "Guidelines" or "Rules" tutorial. Notice that you have a perfectly square piece of paper with green hole punches, numbered 1-16. If this piece of paper were laying on a table and you were to fold any piece of this paper, in any way, shape or form, there would be a void or "Empty Space" where the original outline of the paper was touching the table.

I just thought of something that I think will help you visualize what I mean by "empty space", so:
  1. Go get a traditional Post-It Note ® (they measure about 3" x 3").
  2. Stick it to the table.
  3. Get a dime and put in where green hole #1 is.
  4. Think of the dime as a hole punch at that location.
  5. Make a mental note of the dime's placement not only on the Post-It Note ®, but also it's location above the table underneath (and the fact that there is paper between the dime and the table).
  6. Remove the dime.
  7. File that image away and start off (mentally) with a perfectly new and intact Post-It Note ® (i.e.: without the aforementioned hole punch).
  8. Take the entire left edge of the Post-It Note ® and fold it over to the right edge (i.e.: crease it vertically straight down the center of the Post-It Note ®).
  9. Put the dime back in the exact same space (on the table) where it was before when the Post-It Note ® was still unfolded. If you think of the dime as a hole punch, can you have a hole punch there given the fact that I told you to fold that paper out of the way? No, right?...you punched a hole over "empty space"....there wasn't paper there (touching the table) to punch through.
  10. The dime is now in what I call "Empty Space" because there is no paper separating it from the table.
  11. Going one step further, get a new Post-It Note ®.
  12. Stick it to the table.
  13. Look at the example in my tutorial and make that first columnar fold shown in figure 1.
  14. Now make that second fold (where that bottom-right corner is folded diagonally up and to the upper-left corner).
  15. Now put the dime in the upper-left hand corner.
  16. Consider the dime a hole punch.
  17. It'll obviously create a hole in the paper that you just folded from the bottom-right corner up onto the upper-left corner, but it will not make any holes underneath that because you moved that first layer of paper out of the way (creating "empty space") when you made your first fold.

To synopsize:
  • When you fold any part of the piece of paper off of the table, you create a void (or "empty space") where that piece of paper was originally touching the table.
  • If you then fold the paper a second time and the second fold results in paper hanging over or otherwise being on top of that void, any hole punch (over the "empty space") at that time will result in holes only in the layer of paper that was overhanging the void (or "empty space"), and will not result in holes in the "empty space" because you moved that paper out of the way when you made your first fold....because there's no paper there to punch through after the first fold.


The only other thing I could suggest is to print out the square with the 16 numbered green holes. Cut it out. Then follow the tutorial example step-by-step, including the hole punches and see that punching a hole over a void (or "empty space") will not result in a hole in that void (or "empty space").

I hope that makes sense.


Best regards,


Justin (2thDMD)


Crack the DAT software is available here: http://www.crackdat.com/
 
Last edited:
Hey everyone,
I'm gonna make a lil contribution to this thread and it deals with dice questions and/or cubes. My method is you lay your left hand flat with your palm facing up and then use your other hand and with your palms facing each other, make a sort of spider legs with your thumb, index, middle, and ring finger extended and toucing the opposite palm. Your thumb will be at the bottom, index the left side, middle the top, and ring the right side. The palm on top will be centered number.
It may seem confusing so I'm goin to use the dice from the first page as an example and can verify your how B is correct.
diceorig.jpg


Since the four will be the bottom of the cube that will be your left hand palm. Your other hand will have the five as your other palm, index as the 1, middle will the be 3, ring the 6, and thumb the 2. From there your can move your hands so that you can see whatever perspective you want. I'm gonna be looking like a ***** while doing these questions however after some practise this becomes pretty efficient.

Very cool!
Never would have thought of it to do it that way, but it makes perfect sense.
Thanks for sharing.

Justin (2thDMD)
 
Wierd, I don't quite understand this spider method for the dice haha.. I think its time for someone to post a youtube video of them trying it:laugh:.

Or if anyone has figured it out, could they elaborate on how they did it?
 
can someone help me with the attached keyhole problem please?

I just can't seem to understand it.


And thanks so much for this thread...its def a life saver :)
 

Attachments

  • Doc1.docx
    29.9 KB · Views: 653
Top