Ok, so, because I have an english midterm tomorrow that I don't want to study for, and because there's 600 posts about how impossible TFE is, and also because I'm good at TFE and feel like being a hero, I'm gonna make a little tutorial where I post a couple of them and talk you through the answer! After I do that, you can scan/post any other ones you want and I'll do my best to explain them. I don't use any weird strategies, I just look at the lines and visualize it in 3D. The tips and tricks you hear about might help narrow it down in some cases but if you can visualize it properly you'll be able to get every question every time.
Oh and excuse the fact that there's writing all over my examples, haha.
Ok first one..
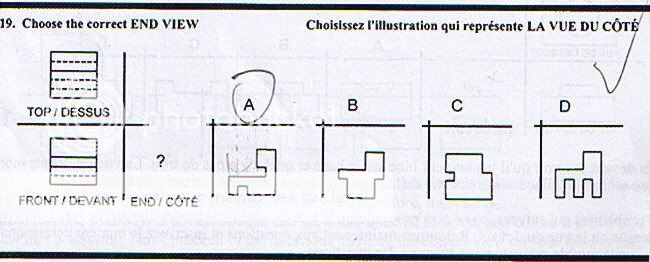
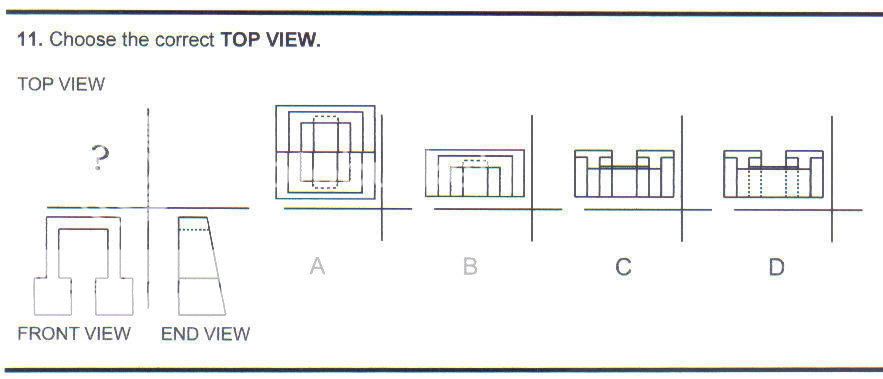
Alright this is a good example for explaining what solid and dashed lines mean.
I assume everyone knows what the different views represent... If not then think of it this way... Imagine a person looking into a camera lens.
A straight up mugshot of the person's face is a "Front" view. Now if you take the camera and move it up, then pivot it and aim it downwards, you've got a "Top" view. Now for the end view, take the camera and put it back in front of the person's face...then you'd take a side-shot of the person's left cheek (but since you're the camera man and you're facing them, you're moving the camera to your right side).
Ok great.
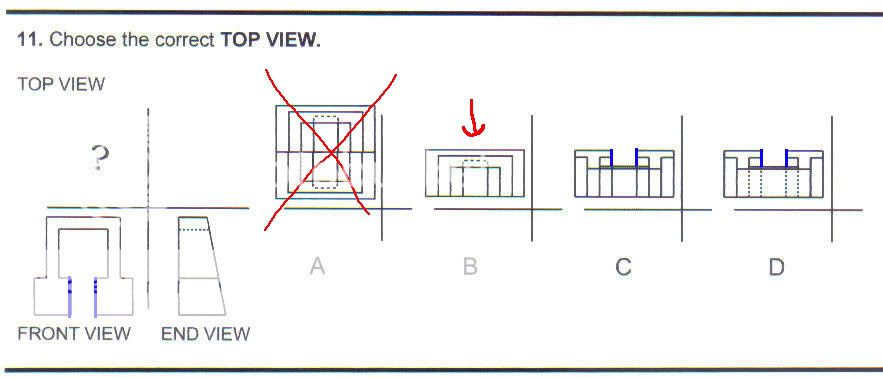
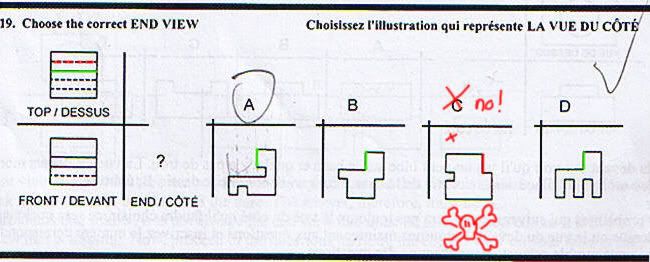
First, looking at the top view, you have one solid line that goes all the way across, from left to right. That means that from a side view, you're only going to have one change in height. Now remember that a straight line like that can mean a straight up drop in height, or it can mean there's a slope with a gradual decline. Looking at all the answers though, it's pretty obvious that we're not looking at any slopes. However, every one of the answers has a single drop in elevation on the top part, so that little bit of information isn't going to narrow it down too dramatically. But... dun dun dun.. look at choice C. Choice C does have a drop in elevation at the top, which is what we decided we're looking for, but it's got the drop at the position of one of the dashed lines (you can tell by the position and thickness of the notch). That's bad! I'm sure this is a trap some people fall into, but yeah, don't. Look at "Fig 1" to see which solid line I'm talking about and where it corresponds to a drop in height in each of the answers (green). Red line = danger = don't fricken do it. Dashed lines do not represent any changes in elevation on the surface they appear on (did that make sense?). Dashed lines are there to show you that there's some kind of height difference deeper into the object, or on the other side all together (what I mean is, it could be a hole that passes through the middle of the object, I'll explain more later if I find an example)
Fig 1
On to the dashed lines we go.
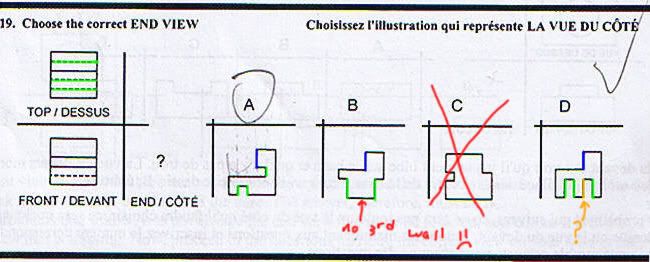
So we've got three horizontal dashed lines on the top view. That means that somewhere in the object, you've got at least 3 extra "walls" (you'll see why I say 'at least' in a second). In other words, there's some kind of height change somewhere that isnt visible from the top. Based on the relative positions of the lines, you'll be able to figure out where the 'height' differences are supposed to be.
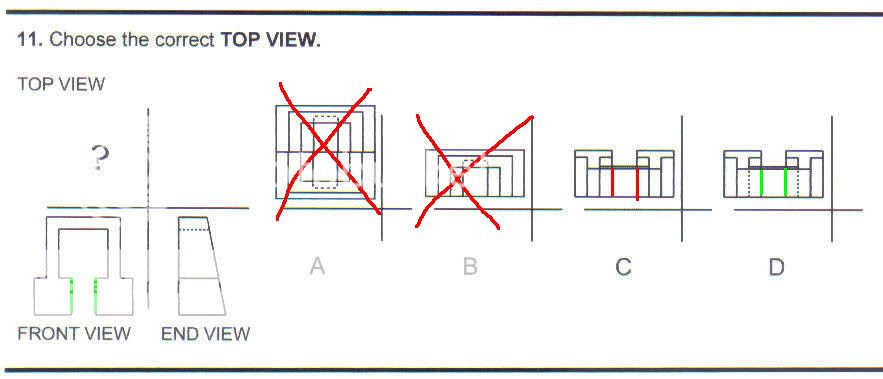
Let's compare this to the answer choices. Choice A has 3 walls that you cant see from the top view, D has 4. However, look at the orange line in Fig 2 with the question mark. This wall is lined up perfectly with the blue height change that we discussed above. Because of this, its dashed lines won't show up in the top view (for no reason other than the fact that if you draw a solid line on top of a dashed line...you get a solid line ).
).
All the walls are spaced apart proportionally to the dashed lines in the top view of the original figure in A and D. Look at B though, it only has 2 of these "walls" that we established you couldn't see from the top. Look at Fig 2. Green = good, red = bad, blue = done, orange = tricky POS.
Fig 2
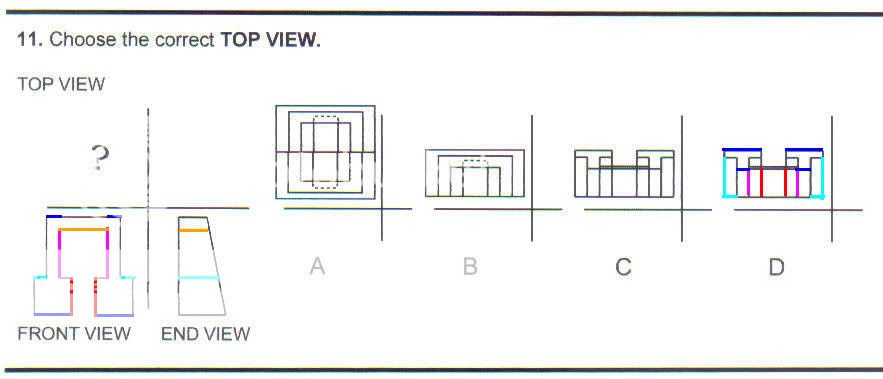
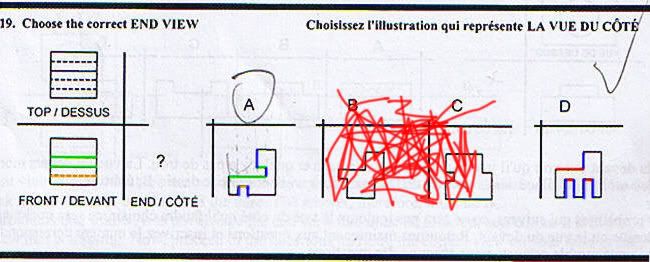
Great, so we've narrowed it down to A or D. We've done about all we can do with the top view so let's go to the front view. Here we've got 2 solid lines, so from a head-on view, there's 2 height changes. From everything I've said so far about the top view, this should be really easy to figure out, so I'm just gonna include a final figure (green = solid lines and what they correspond with, blue = stuff we already talked about, red = why D is wrong, and orange = dashed lines and what they correspond to)
Notice also how high up the notches go in D, I've highlighted them in red. You should notice that these are way, way higher up than the dashed lines on the front view, so that's another way to eliminate it.
Fig 3
Alright so after all that we can safely conclude that the answer is indeed C.
Just kidding... .......It's A.
So yeah, that took way longer than I thought it would and I'm thinking it might have been too simple of an example to be helpful... I hope it helps someone though. If someone can find a really hard one they want me to go through post it here.
Oh crap.. exam tomorrow
Oh and excuse the fact that there's writing all over my examples, haha.
Ok first one..

Alright this is a good example for explaining what solid and dashed lines mean.
I assume everyone knows what the different views represent... If not then think of it this way... Imagine a person looking into a camera lens.
A straight up mugshot of the person's face is a "Front" view. Now if you take the camera and move it up, then pivot it and aim it downwards, you've got a "Top" view. Now for the end view, take the camera and put it back in front of the person's face...then you'd take a side-shot of the person's left cheek (but since you're the camera man and you're facing them, you're moving the camera to your right side).
Ok great.
First, looking at the top view, you have one solid line that goes all the way across, from left to right. That means that from a side view, you're only going to have one change in height. Now remember that a straight line like that can mean a straight up drop in height, or it can mean there's a slope with a gradual decline. Looking at all the answers though, it's pretty obvious that we're not looking at any slopes. However, every one of the answers has a single drop in elevation on the top part, so that little bit of information isn't going to narrow it down too dramatically. But... dun dun dun.. look at choice C. Choice C does have a drop in elevation at the top, which is what we decided we're looking for, but it's got the drop at the position of one of the dashed lines (you can tell by the position and thickness of the notch). That's bad! I'm sure this is a trap some people fall into, but yeah, don't. Look at "Fig 1" to see which solid line I'm talking about and where it corresponds to a drop in height in each of the answers (green). Red line = danger = don't fricken do it. Dashed lines do not represent any changes in elevation on the surface they appear on (did that make sense?). Dashed lines are there to show you that there's some kind of height difference deeper into the object, or on the other side all together (what I mean is, it could be a hole that passes through the middle of the object, I'll explain more later if I find an example)
Fig 1

On to the dashed lines we go.
So we've got three horizontal dashed lines on the top view. That means that somewhere in the object, you've got at least 3 extra "walls" (you'll see why I say 'at least' in a second). In other words, there's some kind of height change somewhere that isnt visible from the top. Based on the relative positions of the lines, you'll be able to figure out where the 'height' differences are supposed to be.
Let's compare this to the answer choices. Choice A has 3 walls that you cant see from the top view, D has 4. However, look at the orange line in Fig 2 with the question mark. This wall is lined up perfectly with the blue height change that we discussed above. Because of this, its dashed lines won't show up in the top view (for no reason other than the fact that if you draw a solid line on top of a dashed line...you get a solid line
All the walls are spaced apart proportionally to the dashed lines in the top view of the original figure in A and D. Look at B though, it only has 2 of these "walls" that we established you couldn't see from the top. Look at Fig 2. Green = good, red = bad, blue = done, orange = tricky POS.
Fig 2

Great, so we've narrowed it down to A or D. We've done about all we can do with the top view so let's go to the front view. Here we've got 2 solid lines, so from a head-on view, there's 2 height changes. From everything I've said so far about the top view, this should be really easy to figure out, so I'm just gonna include a final figure (green = solid lines and what they correspond with, blue = stuff we already talked about, red = why D is wrong, and orange = dashed lines and what they correspond to)
Notice also how high up the notches go in D, I've highlighted them in red. You should notice that these are way, way higher up than the dashed lines on the front view, so that's another way to eliminate it.
Fig 3

Alright so after all that we can safely conclude that the answer is indeed C.
Just kidding...
So yeah, that took way longer than I thought it would and I'm thinking it might have been too simple of an example to be helpful... I hope it helps someone though. If someone can find a really hard one they want me to go through post it here.
Oh crap.. exam tomorrow


